If you are scrolling through YouTube, it is easy to look at creators with $5,000 cinema cameras and dream of the day you can match their setup. But here is the hard truth: buying expensive gear will not get you views. The camera on your phone can capture stunning video, and a cheap microphone can sound professional with the right settings.
The goal of this youtube equipment list is to keep things practical. I am not here to sell you the most expensive gadgets. Instead, I want to show you the exact gear you need at every stage of your creator journey, from starting with zero dollars to building a professional multi-cam setup in 2026.
Quick Answer
To start on YouTube in 2026, you need a high-quality smartphone or mirrorless camera for video, a dedicated USB or XLR microphone for clear audio, a bright key light and softbox, and a stable tripod. Focus your budget on audio first, lighting second, and cameras last.
---
The Core Concept: Audio First, Lighting Second, Camera Third
If you remember one rule from this guide, make it this: Viewers will tolerate bad video quality, but they will click away instantly if the audio is bad.
A 1080p video with crystal-clear voiceover is highly watchable. A 4K video with muddy, echoing audio is unwatchable. When you are deciding where to allocate your budget, always prioritize a good microphone.
Once your audio is sorted, focus on lighting. Even cheap cameras look incredible under great lighting. A $3,000 camera looks flat and grainy in a dark room.
Key Takeaways
- Audio is 50% of the video; invest in a quality microphone first.
- Great lighting makes cheap cameras look professional.
- Choose cameras with reliable face-tracking autofocus and flip-screens.
- Tiered budget setups let you grow from zero to pro organically.
- Write off your equipment costs under tax-deduction rules.
---
📸 Tiered Setup Comparison
Before we dive into the specific gear, let's look at the three main setups you can build depending on your budget:
| Setup Tier | Primary Video | Primary Audio | Lighting | Ideal For |
|---|---|---|---|---|
| Zero-Budget Starter | Smartphone (iPhone/Android) | Natural Light + Lapel Mic ($15) | Natural window light | Vlogs, basic tutorials, new channels |
| Semi-Pro Creator | Sony ZV-E10 II or Canon R50 | USB Mic or Rode VideoMicro | Godox SL60W + Softbox | Talking head, reviews, intermediate channels |
| Studio Pro Setup | Sony A7 IV or Lumix S5II | XLR Setup (Shure SM7B / Rode NT1) | Aputure Amaran 100d + Diffuser | Podcasts, high-RPM niches, full-time creators |
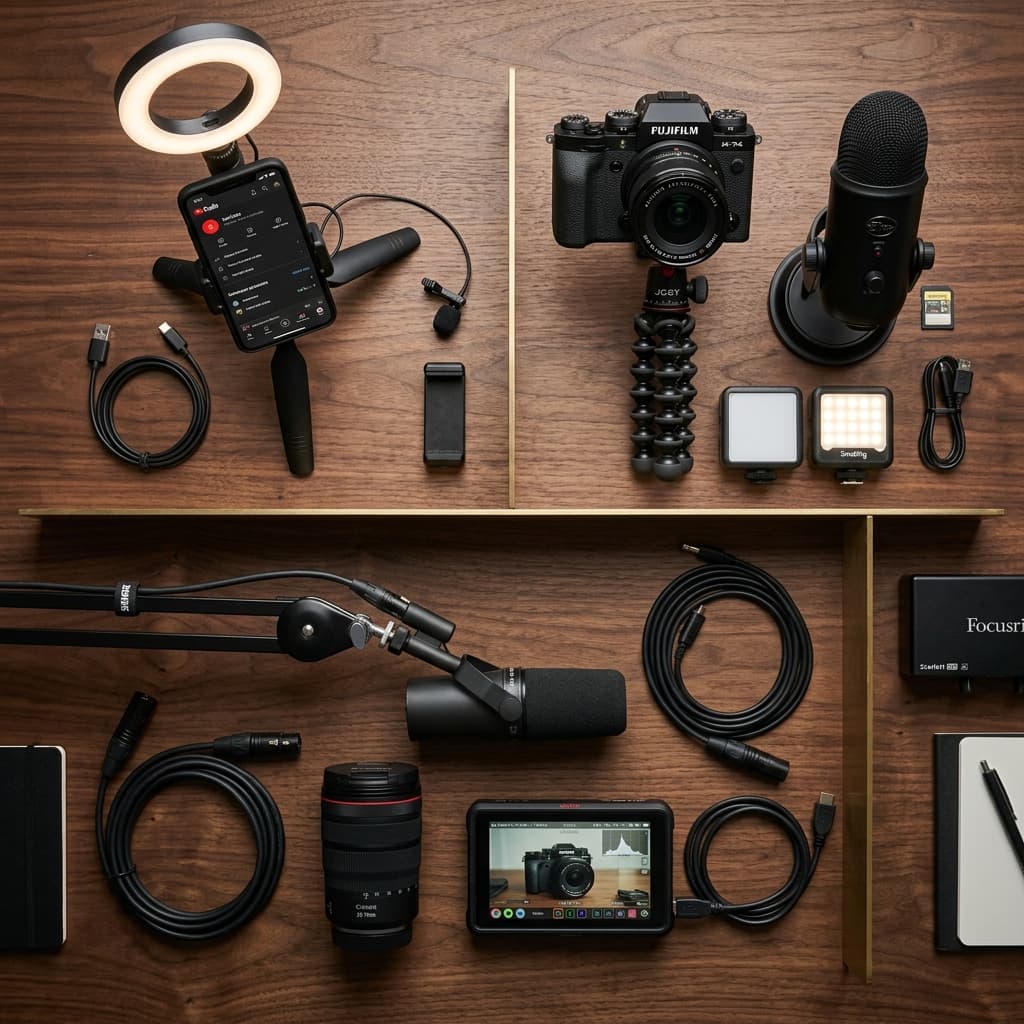
Top-down view comparing three tiers of YouTube creator equipment: Beginner, Intermediate, and Pro setups organized neatly on a dark wooden table
---
1. Video Cameras: Finding the Right Eye
You do not need a DSLR or mirrorless camera to start. The phone in your pocket is likely more than capable of recording great content. However, if you are looking to upgrade, here are the key features to look for:
- Autofocus: You need real-time face tracking. If you move around, the camera must keep you sharp automatically.
- Flip Screen: An articulating screen allows you to see yourself while filming, ensuring you are in frame and in focus.
- Clean HDMI Output: If you want to use the camera as a webcam or stream directly, this is a must-have.
Budget: The Smartphone Setup
Most modern smartphones can shoot in 4K at 30 or 60 FPS. To make the most of it:
- Use the rear camera, not the selfie camera (the rear camera has a larger sensor and better lenses).
- Lock your exposure and focus before you start recording to prevent the image from shifting colors or pulsing.
Mid-Range: The Vlogger & Creator Standard (Under $800)
- Sony ZV-E10 II: The absolute king of beginner cameras. It has the best autofocus in its class, a flip screen, and a large APS-C sensor for beautiful background blur (bokeh).
- Canon EOS R50: A great alternative with excellent color science out of the box.
Professional: The Full-Frame Studio ($2,000+)
- Sony A7 IV: The industry standard for professional creators. Excellent in low light, shooting 4K 10-bit color, and unmatched autofocus.
- Panasonic Lumix S5II: Unbeatable image stabilization and color grading tools.
---
2. Audio: Making Sure You Are Heard
Good audio is non-negotiable. If you are recording a tutorial or screen share, you want your voice to sound warm, present, and free of echo.
USB Microphones (The Simplest Choice)
USB microphones plug directly into your computer. They are perfect for voiceovers, gaming, and screen recordings.
- Rode NT-USB Mini: Compact, crisp, and has a built-in pop filter.
- Elgato Wave:3: Excellent software control that prevents your audio from clipping (distorting) when you get loud.
XLR Microphones (The Professional Standard)
XLR microphones require an audio interface (like a Focusrite Scarlett or Rodecaster) to connect to your computer. They are dynamic microphones, meaning they reject background noise much better than condenser mics.
- Shure MV7: A hybrid USB/XLR microphone that grows with your channel.
- Shure SM7B: The legendary podcast microphone. Needs a pre-amp (like a Cloudlifter) or a high-gain interface.
If you are using a professional microphone, run a channel audit of your audio tracks inside your editing software to ensure you are outputting dual-mono and not just recording on the left channel.
---
3. Lighting: Shaping the Scene
You can have a $5,000 camera, but without good lighting, your video will look amateurish. The secret to professional lighting is the three-point lighting setup:
- Key Light: Your primary light source. Position it at a 45-degree angle to your face, slightly higher than eye level. Use a softbox or diffuser to make the light soft and avoid shadows.
- Fill Light: A softer light placed on the opposite side of the key light to fill in the shadows.
- Backlight (Hair Light): Placed behind you, pointing at the back of your head or shoulders. This separates you from the background and adds depth.
Budget Lighting
- The Window: Sit facing a large window. It provides the softest, most beautiful light for free.
- Neewer Ring Light: A solid, cheap starter light that mounts directly around your camera.
Professional Studio Lighting
- Amaran 100d: A powerful LED point-source light that you can pair with a light dome softbox for beautiful, cinematic lighting.
- Elgato Key Light: A sleek, desk-mounted LED panel that you can control directly from your computer or Stream Deck.
---
4. Supporting Gear: Tripods, Prompters & Workspaces
The small accessories are what keep your production running smoothly.
- Tripods: Do not buy a $15 plastic tripod. One bump can send your camera crashing down. Invest in a sturdy tripod like the Manfrotto Element or Ulanzi Travel Tripod.
- Teleprompters: If you write scripts, a teleprompter (like the Desview T3) lets you look directly into the lens while reading your lines, maintaining direct eye contact with your viewers.
---
💰 The Business of Gear: Tax Deductions and ROI
Here is a major tip for creators in Tier 1 countries (United States, United Kingdom, Canada, Australia): Your YouTube gear is a tax-deductible business expense.
If you are running your channel as a business, you can write off your cameras, computers, editing software, and studio workspace.
- United States: Section 179 allows you to deduct 100% of the cost of eligible equipment in the year of purchase rather than depreciating it over time.
- United Kingdom: You can use Capital Allowances to claim tax relief on equipment.
- Australia: The Instant Asset Write-Off scheme allows immediate deduction for business assets.
Before you invest thousands of dollars into a new setup, use our earnings calculator to estimate how many views you need to generate to recoup your investment. If a new camera costs $1,500 and your average CPM is $15, you need about 100,000 views to pay off that gear. Be smart with your business cash flow!
If you are ready to plan your next video concept and see if the topic has high CPM potential, browse our catalog of youtube tools to maximize your video reach.
Topics
❓Frequently Asked Questions
Do I need a 4K camera to start on YouTube in 2026?
No, 1080p is more than enough for most beginners. Viewers value high-quality audio and interesting content far more than 4K resolution. In fact, most viewers watch on mobile devices where 4K is barely noticeable. Focus on clean audio and solid lighting before upgrading to 4K.
Should I buy a USB or XLR microphone?
If you are a beginner or solo creator who wants simplicity, choose a USB microphone like the Elgato Wave:3 or Rode NT-USB. They are plug-and-play and don't require extra gear. XLR microphones (like the Shure SM7B) offer better pre-amps and control but require a separate audio interface, making them better for professional setups.
Can I write off my YouTube gear on taxes?
Yes, in Tier 1 countries like the United States, United Kingdom, Canada, and Australia, you can write off equipment used exclusively for content creation as business expenses. For example, under Section 179 in the US, you can deduct the full cost of cameras, computers, and lighting in the year of purchase. Keep detailed receipts and consult with a tax professional.